It has been ages since we last posted a blog. Our
apologies. We've been really busy since returning to Melbourne after
Ed completed Neill Gorton's prosthetics course in London in 2012. And
there have been some significant developments and achievements since
that adventure:
Alana is undertaking her certificate III in
hairdressing to become a qualified hairdresser. This means that
Alana will have both a diploma of specialist make-up services as well as
a certificate III of hairdressing. Since returning to Melbourne Alana also trained with an award-winning
wig maker learning about hair knotting.
We have both established separate websites for our freelance work: www.alanaauden.com & www.edwardyatesmakeupeffects.com
Ed worked on his first feature film in the prosthetics department. The film is a sci-fi thriller called Predestination and he was contracted by Steve Boyle FX for 7 weeks for the work. Had an absolute blast. Looking forward to the next one now!
We established a online shop called Creature Collectibles, selling masks for LARPers, Halloween and fancy dress party goers.
Later
in 2013 Ed trained in Sydney with Brian Sipe, an Emmy award winning make-up
artist. So Ed has now trained with a BAFTA
winner, an Emmy winner, a Screamfest winner and a protegee of an Oscar
winner. Holy cow! Feeling very grateful to have had this experience.
All up a busy return to Oz! Really looking forward to what 2014 will bring!
Sunday, October 13, 2013
Sunday, October 21, 2012
Featured artist on Mouldlife's website
After completing Neill Gorton's prosthetics and animatronics course in London I have been chosen as a featured artist for Mouldlife's website!
This pic (below) of my work can be found here on the right hand side. It will be up there for two whole months!

It's an honour to be picked alongside such talented other artists. Thank you Mouldlife!
Spencer Mahoosive was made exclusively using products from Mouldlife. These can be purchased here.
This pic (below) of my work can be found here on the right hand side. It will be up there for two whole months!

It's an honour to be picked alongside such talented other artists. Thank you Mouldlife!
Spencer Mahoosive was made exclusively using products from Mouldlife. These can be purchased here.
Tuesday, August 28, 2012
Spencer vs. Tech Support...
Our first ever very short film Spencer vs. Tech Support is on YouTube!
We shot this after Ed completed Neill Gorton's prosthetics and animatronics course in 2012 on a Canon 'Rebel' 550D. Forgive the clunky sound. But we shot this in 15 minutes on the last day of the course and have done a quick edit so as to clear some head space for future projects. Hopefully we'll have time to do a proper sound edit in the future or perhaps get one of our friendly neighbourhood sound guys to help with it and 10-20 seconds of music! Hope you enjoyed it!
We shot this after Ed completed Neill Gorton's prosthetics and animatronics course in 2012 on a Canon 'Rebel' 550D. Forgive the clunky sound. But we shot this in 15 minutes on the last day of the course and have done a quick edit so as to clear some head space for future projects. Hopefully we'll have time to do a proper sound edit in the future or perhaps get one of our friendly neighbourhood sound guys to help with it and 10-20 seconds of music! Hope you enjoyed it!
Monday, August 20, 2012
Neill Gorton's Prosthetics Course: Weeks 6-7
The last two weeks of Neill Gorton's prosthetics and animatronics course went by in a bit of a blur and a frenzy of activity. My advice for potential students: work hard, plan your schedule well and don't think of four weeks as a long time. The last bit will fly by! After finishing the course I've only just got around to writing a blog entry. The other thing that occurred in the last two weeks was that I was too busy to take as many pics. A couple of days I actually forgot to take any at all.
At the start of week 6 I finished probably the most complex mold I have made to date. After molding Spencer Mahoosive I then had to lay clay into the master mold and create a new positive. It was a three part fibreglass mold with a new core (positive) created specifically so as to create a thin foam latex skin.


I then bored a hole in the positive and mounted a large injection tube and then drilled out bleeders

After doing this I then poured silicone into this injection tube and created a new silicone core mold. This is a quick and dirty way of molding the core so as to create a silicone mold which can then be used to fabricate thin fibreglass components that sit under the foam latex skin of the creature. It's apparently called 'dirty coring'. I then used this mold to create thin fibreglass components and the old positive of Spencer to make a fibreglass skull cap to mount the components to

This mold then was taken up to the Millennium FX foam lab and James Greenwood helped me run the foam for my creature skin. I also got advice from the Millennium FX mechanic Adrian about creating the animatronic movements for Spencer Mahoosive. Because of the time frame for doing any mechanics it had to be done relatively simply with push-pull cabling rather than doing anything more complex. I designed this project as a learning experience and working in foam latex technician and with a mechanic was two of the things that I thought I would learn the most from as I've already worked with silicone before. That and improving my sculpting and learning how to paint foam latex. By the end of week 6 the first foam was pulled out of the mold. Meanwhile I set about sculpting Spencer's trotters and started pulling apart a computer keyboard (this will become apparently later).

By Friday of week 6 I had the trotters half molded in a plaster mold of Herculite. Then that weekend Alana arrived from Australia. We had been apart for 6 weeks and I was thinking that she would spend the week mostly recovering from jet lag, but instead she came into the studio with me and helped me finish the project. Specifically Alana finished the trotter mold and poured, seamed and painted the trotters, she also fabricated teeth and finished the work on the prop warthog keyboard. Without this last minute help I doubt I would have got a complete creature effect.

This brings me to an important point! Animatronic creatures like Spencer would usually be worked on by a team of people over four weeks rather than just one person. Due to this there were a number of things I still didn't get to do, even though this project represented a significant learning and personal achievement for me. And even though I tried to claw back those two days I was behind schedule they followed me throughout the project. The final hero skin had to be seamed (the mold seam cut away and filled with a mix of prosaide and cabosil - time consuming but worth doing well). After this the whole skin had to be sealed with a coat of Aqua Fix (or prosaide) before painting. I only moved into painting on Thursday and was still painting, hair punching and playing with mechanics on Friday morning of the last day before shooting him.

Next I'll do one final blog post with the images shot of Spencer and hopefully the short video we made. Then it may be on to either bigger things or maybe a beach holiday!
Monday, August 6, 2012
Neill Gorton's Prosthetics Course: Week 5
After a busy week of sculpting form I came into this week still needing to really refine the detail and texture of the sculpt. I had carved in some good deep wrinkles, but they looked exactly that: carved. As this picture shows:

The forehead lines had made Spencer Mahoosive look a lot grumpier though. But really needed to be softened down a fair bit. So I took to the edges of these lines with a loop carving tool then moshed the area with a wet brush. You can very easily go overboard with the water on WED clay and Neill and Dave both warned of using water on a sculpt. So I made sure I only had the very minimum amount of water on my brush to cause a bit of slip to fill the deeper trenches and round off the corners. I then hit it with a hair dryer to dry the clay out again and repeated the whole process. This left lines that looked a fair bit more natural:
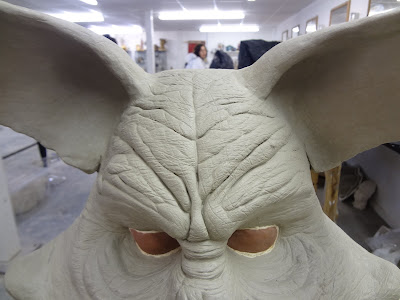
I then refined a lot of the detail on the snout and the snout itself. Warthogs have a bit different looking noses to regular pigs. It’s a really flat shape, with a sort of edge around the outside. It also has a certain downward slant to it. I’m not convinced I got this exactly right, i.e. it looks somewhere between a pig and an warthog, the same goes for the ears, but you’d have to be a warthog aficionado to pick this out. And after all he’s actually somewhere between a warthog and a human…not a perfect anatomical replica of a warthog...

After doing this I returned to the eyes, in particular Spencer’s warthog specific eye bags. Warthogs haves these really big eye bags. Dave, because he’s a brill sculptor, took one look at them and was able to point out that I had been confusing the form of them and they weren’t distinct from the rest of the area where they sat. So I re-sculpted them with some decent reference pictures. That’s actually a really important point to remember, always use references when you’re sculpting! Even professional sculptors will refer to sometimes quite a lot of references, although sometimes only a few are needed and a too many references can also be confusing if you aren't focused.

I also had to extend the mouth back much further than what anatomically looks right. Plus it makes any creature with animatronic mouth look a bit smiley, but this is so that you can hinge the jaw to get enough movement out of it. This is simply because you can’t get foam latex or silicone to stretch as far back the way the elastic skin around the mouth does for dogs, wolves or pigs.

I had decided to give myself a little more sculpting time than I had originally scheduled. I probably could have had shaved a day off this had I got my armature position right in the first place. After finishing the sculpt and getting it ready in the mold room, we had a consultation with a Millenium mechanic Adrian. ‘Mechanics’ are what they call the guys who do animatronics for creatures. He suggested that we could get some good movement out of the nose and forehead area using a combination of cabling. But until I have a foam skin out with a core done, plus have a better estimation of time left to work on the creature it’ll be hard to know exactly what I can get done. After this I then went straight into molding, building a mold wall for the first piece of the mold. The sculpture was first sealed with lacquer and the wall was reinforced with plaster bandages to give it strength. The number 92 tool is the mold wall maker’s dream. Now that I’ve used one, I intend never to lay up a mold wall without one again!

And I then fibreglassed the first section. While I was in between processes during mold making I began to sculpt Spencer’s hoof hands. Dave suggested that I do these ‘old skool’, so I am sculpting them in buff clay, making stone molds for them, and then doing slush latex castings backed up by foam latex. After finishing the first mold piece there is a bit of a clean-up phase, then I had to get up another mold wall and do the second piece of the mold. All up there’s four interlocking parts to this mold. Counting the core mold, ears, hoof hands, tusks, eye bags there will be six molds in total to make this creature.

By the end of the week I had the first mold finished. I reckon I am down about two days in terms of my original schedule to get this finished. Eek! It’s going to be a massive week to come.
Monday, July 30, 2012
Neill Gorton's Prosthetics Course: Week 4
This week we got straight into our final projects: working towards a portfolio piece over a four-week period. On top of this I’d still really like to finish my sculpture that began as copying a lifecast, paint and apply a foam latex piece that I’ve finished the mold for, as well as do another encapsulated silicone piece. But these have been placed on the back burner until I have moments of down time. Which may or may not happen... Here’s hoping I scrounge enough time because I really need the balance of a good anatomical bust sculpt in my portfolio.
Coming into this week I had done some concept sketches as well as a storyboard for a 20-30 second film piece for my creature: a warthog office worker. A sort of surreal were-creature or were-boar. Overall I wanted something that would be a big fun character sculpt with lots of interesting shapes and textures to sculpt. I’d considered an old age make-up but was warned off doing one as the amount of time available usually means people have trouble pulling them off effectively and the guys at Millennium say nothing is worse in a portfolio than a bad ageing make-up! So yes it’s still Holy Grail of special make-up effects even for professionals. I still intend to do one and feel like I’m in a much better position to have a better go at it than before. Mostly because I think I’ll be a much stronger sculptor and special make-up effects artist coming out of the course after the instruction by Dave. It’s just been so great having a good sculptor to prod me and my work and he’s already made me become a so much better sculptor in such a short time! Big thanks and kudos to the bloke.
So final piece going to be a pull over warthog mask that I’ve planned on having a movable mouth as well as some other movement function in the creature. Due to the production timeframe I also made the decision to sculpt it as a ‘generic’ piece rather than go through the process of lifecasting someone, then going through and cleaning up the cast, molding that before producing a fibreglass version to sculpt onto. Basically, even if I was fast it’d be at least another 3 days to do this and place a lot of time pressure on the other end of the project and reduce my sculpting time. So I opted to use an existing fiberglass positive. Everyone meet Spencer:

Spencer was apparently a champion boxer and kick-boxer. He’s a big boy but he has a bit of a sloping forehead that I had to fill in a bit with some body filler. I also decided to chop off the ears for ease of sculpting and molding. I’ll have to leave a bit of room in the skull cap that I’ll fabricate later. After a bit of clean up work, I mounted an armature out of his mouth and covered that with plaster bandages to support the weight of clay on it. He looked a lot like a duck man:

For a big character like this I chose WED clay, as it’s much faster for me to work with than any of the oil based clays. I then started quickly sculpting and creating the basic shape of a warthog. I’d got a fair bit done and looking at the shape it wasn’t absolutely terrible, but after wacking the clay on I was concerned about the angle of his snout. I had my suspicions confirmed when Neill was walking through the studio and I saw him do a double take and come over to look at my sculpture. After a quick con-flab with Neill, the long and short of it was that I just wouldn’t be able to get good movement out of the jaw. And I needed to bring the angle of the snout up to be closer to the actor’s eye line.


Looking at this again I think the position of my armature wasn’t right in the first place. This was a really good time for this to happen, rather than me keep going. So I ripped off the front half of my sculpt and put in a new armature and started sculpting again. By the end of the day Spencer’s nose was back in position.
 Walking home that night I was mulling the look of the thing over and I still wasn’t 100% on the position of the snout. So come day three I walked in; lay Spencer on his back and smashed his nose upward with the flat of my hand which moved it up another 2-3 centimetres. I then began sculpting in some of his fat rolls around the neck and working on the tusks. Dave came over and said I could really cut the amount of clay I had on my sculpt as it was looking ‘mahoosive’ (i.e. Fucking B-I-G); after that I started calling him ‘Spencer Mahoosive’.
I also decided to move the ears as I learned from this sculpt the higher up the ears the friendlier the looking the animal! Neill suggested that I could also put a bit of weight in the tips and get some more free movement out of the design. With part animatronic puppets like this one, the more ‘free’ movement you can get out of the inherent qualities of the design the better.
This week I had to finish sculpting of the tusks to as high a standard as possible and mold them in silicone, so as to reproduce them in hard plastic (called: Easyflow, Fastcast, or Easycast depending on whereabouts in the world you are located) so I could work out the socket points around the mouth and indeed the actual sculpting of the mouth area
Walking home that night I was mulling the look of the thing over and I still wasn’t 100% on the position of the snout. So come day three I walked in; lay Spencer on his back and smashed his nose upward with the flat of my hand which moved it up another 2-3 centimetres. I then began sculpting in some of his fat rolls around the neck and working on the tusks. Dave came over and said I could really cut the amount of clay I had on my sculpt as it was looking ‘mahoosive’ (i.e. Fucking B-I-G); after that I started calling him ‘Spencer Mahoosive’.
I also decided to move the ears as I learned from this sculpt the higher up the ears the friendlier the looking the animal! Neill suggested that I could also put a bit of weight in the tips and get some more free movement out of the design. With part animatronic puppets like this one, the more ‘free’ movement you can get out of the inherent qualities of the design the better.
This week I had to finish sculpting of the tusks to as high a standard as possible and mold them in silicone, so as to reproduce them in hard plastic (called: Easyflow, Fastcast, or Easycast depending on whereabouts in the world you are located) so I could work out the socket points around the mouth and indeed the actual sculpting of the mouth area

So by the end of Week 4 the form was mostly done and I had also made some progress on the texture of the sculpt. Week 5 will be all about micro-detailing the texture of the sculpture and molding the beast! Here are some shots of Spencer at the end of the first week of final project

Coming into this week I had done some concept sketches as well as a storyboard for a 20-30 second film piece for my creature: a warthog office worker. A sort of surreal were-creature or were-boar. Overall I wanted something that would be a big fun character sculpt with lots of interesting shapes and textures to sculpt. I’d considered an old age make-up but was warned off doing one as the amount of time available usually means people have trouble pulling them off effectively and the guys at Millennium say nothing is worse in a portfolio than a bad ageing make-up! So yes it’s still Holy Grail of special make-up effects even for professionals. I still intend to do one and feel like I’m in a much better position to have a better go at it than before. Mostly because I think I’ll be a much stronger sculptor and special make-up effects artist coming out of the course after the instruction by Dave. It’s just been so great having a good sculptor to prod me and my work and he’s already made me become a so much better sculptor in such a short time! Big thanks and kudos to the bloke.
So final piece going to be a pull over warthog mask that I’ve planned on having a movable mouth as well as some other movement function in the creature. Due to the production timeframe I also made the decision to sculpt it as a ‘generic’ piece rather than go through the process of lifecasting someone, then going through and cleaning up the cast, molding that before producing a fibreglass version to sculpt onto. Basically, even if I was fast it’d be at least another 3 days to do this and place a lot of time pressure on the other end of the project and reduce my sculpting time. So I opted to use an existing fiberglass positive. Everyone meet Spencer:

Spencer was apparently a champion boxer and kick-boxer. He’s a big boy but he has a bit of a sloping forehead that I had to fill in a bit with some body filler. I also decided to chop off the ears for ease of sculpting and molding. I’ll have to leave a bit of room in the skull cap that I’ll fabricate later. After a bit of clean up work, I mounted an armature out of his mouth and covered that with plaster bandages to support the weight of clay on it. He looked a lot like a duck man:

For a big character like this I chose WED clay, as it’s much faster for me to work with than any of the oil based clays. I then started quickly sculpting and creating the basic shape of a warthog. I’d got a fair bit done and looking at the shape it wasn’t absolutely terrible, but after wacking the clay on I was concerned about the angle of his snout. I had my suspicions confirmed when Neill was walking through the studio and I saw him do a double take and come over to look at my sculpture. After a quick con-flab with Neill, the long and short of it was that I just wouldn’t be able to get good movement out of the jaw. And I needed to bring the angle of the snout up to be closer to the actor’s eye line.


Looking at this again I think the position of my armature wasn’t right in the first place. This was a really good time for this to happen, rather than me keep going. So I ripped off the front half of my sculpt and put in a new armature and started sculpting again. By the end of the day Spencer’s nose was back in position.


So by the end of Week 4 the form was mostly done and I had also made some progress on the texture of the sculpt. Week 5 will be all about micro-detailing the texture of the sculpture and molding the beast! Here are some shots of Spencer at the end of the first week of final project

Monday, July 23, 2012
Neill Gorton's Prosthetics Course: Week 3
Week three in the studio went very rapidly to say the least. Even with staying back late three nights this week. This week was pretty jammed packed as I was moving between three different projects during the week: running platgel pieces for a nose for a Friday application, sculpting and moulding a mutant plant which I intended to run in foam latex and tinkering with my bust sculpt copying a lifecast. I decided to stop working on the form of my bust sculpt this week and start concentrating on some of the detailing. This week was going to be the week I got this sculpt into molds but the sculpt still needs a couple more days work.

My tutor at Millenium FX, Dave Bonnywell, gave me some good instruction on some sculptural changes to my alien plant suckered to someone's face which made the whole thing both more interesting and more detailed. I probably could have worked a little longer on it but needed to get it into a mold this week.

After a prosthetics application demo by Dave on Thursday we applied and painted up our pieces that we had been working on last week. Getting okay pieces out of my nose mold was a challenge, even for the seasoned platgel runner working at Millenium. She found a way around the problem by lacquering the negative and loads of release. My sculpt had a stick point in the negative of the mold and was too fine in places, as I wanted a super fine piece. A bit of a minor sculpting error I won't be making again. And funnily enough, they same sorts of problems I've had with prosthetics manufacture in the past, still exist at a professional level. It's certainly more of an art than science and materials can act weirdly even in the hands of capable professionals! So interesting lessons learned. And while I wasn't totally happy with the sculpt or the appliance, I'm pretty happy with my paintwork and the effect of shifting Lucy's ethnicity towards a more Semetic look. For future reference the application and paint work took me approximately 2 and a quarter hours.
Dave Bonnywell doing an application demo:
 Lucy looking 'normal':
 With new nose and colouration:
 Shifted ethicity:
 Going into week four, I've been doing some sketching and started gathering reference pics for my final portfolio piece. I've given myself a bit of a challenge: a partial animatronic pull over mask. Very excited about starting work on that!

My tutor at Millenium FX, Dave Bonnywell, gave me some good instruction on some sculptural changes to my alien plant suckered to someone's face which made the whole thing both more interesting and more detailed. I probably could have worked a little longer on it but needed to get it into a mold this week.

After a prosthetics application demo by Dave on Thursday we applied and painted up our pieces that we had been working on last week. Getting okay pieces out of my nose mold was a challenge, even for the seasoned platgel runner working at Millenium. She found a way around the problem by lacquering the negative and loads of release. My sculpt had a stick point in the negative of the mold and was too fine in places, as I wanted a super fine piece. A bit of a minor sculpting error I won't be making again. And funnily enough, they same sorts of problems I've had with prosthetics manufacture in the past, still exist at a professional level. It's certainly more of an art than science and materials can act weirdly even in the hands of capable professionals! So interesting lessons learned. And while I wasn't totally happy with the sculpt or the appliance, I'm pretty happy with my paintwork and the effect of shifting Lucy's ethnicity towards a more Semetic look. For future reference the application and paint work took me approximately 2 and a quarter hours.
Dave Bonnywell doing an application demo:


Monday, July 16, 2012
Neill Gorton's Prosthetics Course: Week 1-2
Currently I'm in the UK and two weeks into Neill Gorton's prosthetics and animatronics course! I've now also traveled as far as I have ever gone in my life before! After a 24 hour flight from Melbourne I touched down in Heathrow, London, 6.30 Sunday morning. I then had a bit of an epic train and bus trip out to Chesham because of engineering works on the line. Arrival time in Chesham: 12.30. I then managed to stay awake until 8pm, as part of my cunning plan to get my body into sync with the new timezone. That sort of half worked. Groggy from jetlag and deliriously tired I then leaped (or should that be limped?) into the first week of the course!
The studio is about a 30 minute walk from where I'm staying, so I'll be getting some good incidental exercise getting there each day. I was greeted by the talented Dave Bonnywell and the other students upon arrival at Unit 9 of Millenium FX. There are five other talented artists doing the course, some from the UK, one from Portugal and another from Turkey. So a truly international group of artists. I worked out I'd probably be fine on most of the technical stuff, but I certainly feel a bit out of my league artistically. After a bit of a meet and greet, Neill Gorton took us for our first day (before handing over to Dave) doing a character sculpting demo mash-up of a gorilla into troll.


We then jumped straight into sculpting a human bust, copying a lifecast. This was a good exercise to start with and Dave got us focused on paying attention to what is really there. I've tried doing one anatomical-realistic bust sculpture before this and it was great to have a very good sculptor prodding me to make changes and where to focus my attentions to develop the form. Whereas when I was sculpting by myself, I've tended to get a bit lost at moments, thinking that something isn't right, but not being entirely sure what precisely to change. I think I've already improved my sculpting a lot after a mere two weeks of doing the course. Shows what some professional instruction can do eh? We'll keep working on the bust sculpt on and off throughout the course and I hope to mold mine and cast a silicone bust out of it and maybe get another portfolio piece out of this exercise. It's a bit of a luxury having a much longer time to work on a sculpture than we've had in the past when working on short films.


Also during the first week we sculpted, molded and applied some flat-bed prosthetics. I've sculpted cuts and bite wounds before so I decided to sculpt a single barrel shot-gun blast. And while I've applied silicone encapsulated prosthetics before, I haven't applied these as transfers, using the actual mould as an application tool! Sounds wacky, but it works. You apply prosaide to the back of the mold and to your victim and this pulls the piece out of the mold and into place. I learned from the exercise that its better to have a really thin silicone mold. I wasn't 100% happy with the application or the shape of the piece: I got air trapped under a portion and I think its a bit circular so the edge still reads a bit and gives the piece away. With some paint and a blood application it's not terrible but its far from perfect. The following images are of Dave doing an application demo, my sculpt and my finished application.


After this we got straight into lifecasting other class members, casting positives in soft plaster (whereas prior to this I've either used much harder Ultracal 30 or Hydrocal) and cleaning them up with our sculpting tools.

While we lifecast other people, we had to clean up and master mould our own faces in silicone and fibreglass. After this we handed them over to other people to cast either urethane or fibreglass positives out of for our next assignment of creating snap moulds or two part fibreglass moulds

My decision for the next prosthetic piece is based on the feedback I've got from people looking at my portfolio: more realistic/anatomical and subtle work. So I've chosen to make a subtle nose piece that will shift Lucy towards a more Semitic look. But being me I've also decided to sculpt and cast something much more out there: an alien plant suckered into a person's face and growing out of their mouth, which I'll run in foam latex instead of encapsulated silicone!

This weekend I'm in planning and design phase for my final portfolio piece which will be put together over the last four weeks of the course. I'll try and blog that week by week as I go but I think it could be once a fortnight, but it depends on how much energy I have at the end of each week.
Thursday, June 28, 2012
Prosthetics in comedy
When thinking about prosthetics many people might assume that the most common usage would be in the horror and sci-fi genres. This is probably true, but such appliances can also be used to good effect in comedies. We've worked on a significant number of comedies since we started doing special make-up effects and while a couple have been more straight up comedies an equal number have been cross-genre pieces: sci-fi-comedy, comedy-horror and dra-medy. After working on these sorts of films, I'd say that comedy is hard to do well and mixing comedy with another genre even harder.
It's not like there haven't been comedies that use prosthetics and that don't involve significant character make-ups, but these have been predominantly UK based comedy series: Little Britain, The Catherine Tate Show, Psychoville are some examples. Whereas prosthetics in mainstream broadcast Australian comedy is currently non-existent.
In some ways the use of prosthetics in comedy can work to the advantage of the comedy, because in comedy people know that it is someone playing a character rather than it being a real person, so this gives people permission to laugh at a subject they might not otherwise: think Bubbles in Little Britain.
Late last year we worked on a Tropfest entry directed by Chas Fisher, starring Hannah Gott and Ryan van Djik shot entirely on an iPhone! Its an interesting use of prosthetics for comedy because I feel its used in a cartoony sense. Alana did the hair and Hannah's eyes, while I pretty much did the rest. Hope you like it!
I'm also on count down to heading off to the UK to do Neill Gorton's prosthetics and animatronics course. And although I'm super excited about this and really looking forward to being over there doing the course I'm also a little sad to be leaving friends in Australia for some time, not being able to work on some peoples' film projects for at least the rest of this year and a little teeny bit scared. But I also know people regret things they didn't do more than things they did!
Thursday, April 5, 2012
Anatomical sculpture
First up an apology for lack of action on our blog (apart from adding a FAQ and new Facebook badge). Sorry, I've been really busy. Plus we have some exciting news, in late 2011 I decided to apply for Neill Gorton's prosthetics and animatronics course in the UK and sent an updated folio of 12 images of prosthetics, props, mould making and sculpting work into Millennium FX for Neill to have a look at. I had mulled over the idea of applying the year before, but I'm glad I didn't as I so wasn't ready.
Then the improbable happened: I got a letter back from Neill inviting me to undertake his 7 week course! I'm one out of 6 who got in. Amazing, unbelievable news. After being blown away with excitement, I slowly began to freak out about the logistics of doing the course. London was after all a long way away from Melbourne and I'd have to generate funds for the course fee, plane ticket, living expenses etc, etc. So with this in mind I've been forced to decline a lot of freelance creative work. Which frustrates me no end, as even though some of it was paid it was irregular and I wasn't going to be able to save. So I've taken up a more steady job labouring to save to cover costs of doing course.
Some of the feedback from Neill was that I should practice more anatomical sculpture. I think I already kind of knew this, as I'm the first to admit a lot of my work is on the fringes of reality. So with this in mind I developed a small project: Sculpt a realistic bust in WED clay.
I hadn't used WED clay for a sculpture like this before (mould walls only). I know, I know, what kind of sfx artist am I right?! I've stuck with Chavant, plasticine and klean klay. So I decided I'd sculpt my friend Dave as he's conveniently bald and shaves his head! I'll admit I also had never sculpted a human bust from scratch before. I'd used lifecasts and done prosthetic and prop sculpture that was anatomical, but hadn't done a realistic human from scratch. So this was designed to be a learning experience. Here are some photos of the finished sculpt, which I then decided to mould. Hope you like them!


Sunday, September 25, 2011
Dead Foxes
Following our work on Nailed Darlings in July we were contacted by the production designer, Coco, about doing make-up and special effects for her second year VCA film titled Dead Foxes. I'm really proud of the work I did for this film and think its some of my best to date. Given the fact that it was a mere ten days from life-cast to having the fox prosthetics on set, especially so.
First up we life-cast the youngest person we've cast thus far: Isabella age 10. Isabella was recovering from a head cold so we put it off until the last possible day when she was feeling better. I was a little nervous going into this life-cast because of her age, but Isabella was easy to work with and a total professional. Before doing her face and neck we life cast her fingers so she understood the process. Plus she got fingers to take home with her.

Then I cleaned up the stone life cast and made a silicone mould with a fibreglass mother-mould of Isabella's face.

After doing this I made a fibreglass positive of her face to sculpt onto. The turnaround on this process was insanely tight: Day 1 lifecast, clean up, silicone mould, Day 2 fibreglass mother-mould, fibreglass positive, Day 3 trim edges of positive and clean with water and IPA, Day 4-5 sculpt prosthetic, Day 6 fibreglass mould, Day 7 trimming edges, cleaning moulds, silicone into nose, Day 8 pull piece, make whiskers, sculpt teeth, Day 9 mould teeth, make teeth, paint and varnish teeth, attach them. Day 10 last fiddling around with it.

The sculpt was probably the fastest I've ever done. I knew it had to be done quickly so I used plasticine rather than Chavant NSP which I would have used if I had another 2-3 days up my sleeve.

Finished piece before attaching it to actor's face.

Some shots that I think I'll probably use for my portfolio entry into Neill Gorton's course in the UK sometime next year.


With some practice Isabella managed to get really good movement out of the piece. But she only worked out she could move the mouth after finishing her scenes.

I also did character make-up for the lead actress, Sarah. The third day of shooting called for Sarah to look dirty in a fairly surreal scene set amongst the ruins of this amazing burned down house surrounded by rusted car bodies and corrugated iron.

I'm not sure that you could probably take a bad shot of Sarah and James on location for the third day of shooting.

All up I feel like everything worked really well on this film: from script, acting, sets and locations, to make-up, production design and direction.
Subscribe to:
Posts (Atom)